
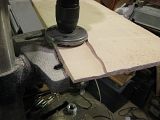
Finally got around to building a thickness sander attachment for my lathe. Still a few finishing touches like a dust box but works pretty well.


Finally got around to building a thickness sander attachment for my lathe. Still a few finishing touches like a dust box but works pretty well.
Last edited by Jim Baker; Jan-31-2010 at 9:38am. Reason: trouble with link
Jim Baker

Looks good Jim, watch your knuckles. Did you sling any wood across the room yet?

Thanks for posting this Jim, Ive been battling with the concept of building a drum sander for a while and just had the DOH moment when I saw your post. A couple of questions for you.
What diameter and width are the drum? What speed do you run it at? How do you keep the timber from flying across the room?
I considered doing this to my metal lathe. I decided I didn't want a converted machine so I built one from scratch. I weighed the PITA factor of setup the sander up each time I wanted to use it against the cost and decided to build from scratch. I also decided I didn't want fine saw dust all over the machine. Since you already have a wood lathe and the woodworking skills, building an inexpensive machine isn't that difficult. This is my machine.
http://www.youtube.com/watch?v=goOm0EomstA
It needs improvements, but if all you are doing is making small quantities it works great.
Yes, I did lose one piece of wood when I was testing it. You gotta hold on pretty tight. The piece flew across into the side of my furnace. No damage done. (Yet). The idea is to hang on tight and don't take too much off at once I guess.
It's turning 980 rpm at the moment. I'm tempted to take it up a notch, but maybe should put some padding on the furnace first.
The drum is 6" long and 3" diameter. I bought it from Busybee. It is a spindle from a spindle sander that they sell I think. It only cost my $20 or so, so I don't have much tied up in it yet.
Slausonm: I really like your machine and was planning to build one like it. But, I just couldn't find the room or the money, so opted for a compromise. It only takes 10 minutes to knock it down or set it up. I have to do back and sound board for my current project. I'll tell you more when I get them done. I sure would like to be able to thickness the whole top or back after glueing up. This way I'll have to thickness first and then joint. Any bets?
I plan to take the top pieces to .125" and then joint and finish by hand. The back is maple so I'll try to get it to .090" and then joint it. This is my first so there is some risk involved.
All tips welcome.
Jim Baker
Hi Jim,Originally Posted by Jim Baker

Im sure you've heard it a million times, "practise on scrap". I think the idea is to remove in 1/2mm increments. Ive also been told to put the timber in at an angle to spread the heating of the sandpaper across the drum. Increases longevity Im told.
I assume you are sanding against the spin of the lathe.
Thanks for these Sebastiaan56. Yes, I'm sanding against the spin. Even with that, I've discovered there is a high risk of projectile sanding. I had begun thicknessing my side pieces using a belt sander and a freehand drum because there was some degree of warpage in the pieces. Yesterday I finished them in my drum sander down to .090" with good success. My next challenge is to do the back pieces.
I will experiment your angled approach for sure. It makes good sense.
Jim Baker
I use a Wagner Safe T Planer for the thicknessing Jim. What interests me about the system you have there is finishing after the bulk of the thicknessing is finished. Its a bit of a bother sanding the marks from the planer back.
Please keep us appraised of your progress.
Hey, I have one of those Safe T Paners! I'm going to give that a try. Only thing is my drill press is a bit smallish. I'm going to try it tonight.
Jim Baker
Jim, I hope I'm not too late....BE VERY CAREFUL !

The GAL has plans for a shop made thickness sander made by the late Ted Davis in their big red books and it used to be available as a full sized plan.
I've seen several of them where the drum is turned on the lathed.
j.
www.condino.com
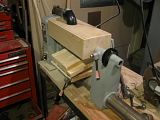
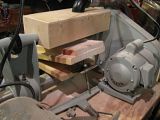
Thanks Jerry. So far no injuries. Here are a couple pictures of the sander finished. The dust box works very well. It's hooked up to our old Filter Queen, which we bought over 30 years ago. Makes a nice dust collector. I also include a picture of my Safe T Planer. It works very well on the spruce top wood.
Jim Baker

I don't see how you can control the sanding with this since there is nothing to prevent it from just sucking the wood through. How do you hold on to 1/8" thick piece of wood?

Very, very carefully I'm guessing.
Gunga......Gunga.....Gu-Lunga

The whole thing gives me the willies.
Root'n Toot'n World trav'ln Rock sniff'n Microscope twiddl'n Mando Mercenary
Tuxedo Mines
Triggs Mandolins
Youtube Stuff
It's actually very simple. You feed the wood against the spin of the drum. I thicknessed my top wood last night with no problems at all. (and no dust I might add) It works far better than I imagined.
I think I'll do a video to show how easy it is.
I also used my Safe T Planer to rough down one piece. It worked fairly well, but I did have some problem with it binding as I went further in toward the center of the piece. The cutters are worn and I am sure that there is not enough clearance between the cut and the body of the planer. I wonder if you can get replacement blades.
Jim Baker

Howdy Jim,
I've been using my saf-t planer for about 4 years, haven't had to replace the blades yet; but I have sharpened several times. I use a small drill press vice to hold the cutter and the sharpening stone in the drill press. I built a table 14" x 24" that bolts into my drill press table to give me better control of larger pieces of wood. I take off 1 to 1.5 mm per cut, I think 1/8 inch is the max; the less you take off, the more in control you are. Also by taking less off, you probably have to sharpen less often.
Separate cutters are available(set of 3) thru Woodcraft, LMI or saf-t planer.
As someone who says my prayers any (rare) time I turn on a jointer, the saf-t planer really is pretty safe.
Oh yeah, always run it at the top speed in your drill press(3050rpm on mine). I ran it once at 1000rpm; at that speed it basically doesn't work.
benny

There's really not too much difference between this home made rig and most other thickness sanders. The dust box helps prevent your fingers from getting sucked into the roller, you just need to exercise caution when feeding wood into any power tool. Do not attempt to take off too much at one time or you may not be able to hold on.
Looks great!
_____________________________________
~Jack Spira bouzouki~
~Trinity College Irish bouzouki~
~Alabama Tenor Banjo~
~Vintage J.W. Pepper bowlback mandolin~
My YouTube channel
I'm not concerned with fingers getting sucked in. It's the possibility that the wood can get kicked back and launched at you or across the shop. My jet 10/20 has an automatic feed roller that prevents the wood from being thrown back.
Maybe I could put up a net to catch the ones that get away.
Jim Baker
I made one almost exactly like the OP's; dust hood and all. I have since replaced it with a 10-20 Jet/Performax (got a great deal at a pawshop). I will tell you that I indeed launched pieces of wood with my homemade, lathe based sander. It was a very scary and stressful device to operate. I found that some dust would accumulate on the adjustable table and act as a lubricant and promoted launching. I was also considering creating a heavy MDF sled with a large handle to better control the feed. The thought was also that the heavy MDF might not launch as easly. Never got the chance to try it.
Be safe!
Actually I feel safer with my sander that with my jointer. Those things are scary. All part of the adventure I guess.
Jim Baker
I cut myself unpacking and setting up my jointer for the first time (cleaning the goo off the blades). Sort of set the tone of our relationship over the last ten years.
Now I walk up "OK jointer, I don't like you and you don't like me. Let's just put a perfectly flat surface on this piece of wood and you can go back to sitting there looking all mean and dangerous."
Here is a little demonstration.
http://www.youtube.com/watch?v=mRrHhqe0g00
Jim Baker
It does seem to work well.
 Posting Permissions

 Reply With Quote
Bookmarks